Posts

ZWO ASI 6200 MC Pro First light

Image
Finally a clear night again. There were a few high clouds, but nevertheless I could finally try out the new ZWO ASI 6200 MC Pro on February 16. The clouds were noticeable in the photos, but the result was still promising. At least I could try out a few things and among other things initialize and activate the autofocus function in the Voyager. So from now on I can automatically refocus during longer image sequences. On February 17th it was clear and I had programmed the following objects to be photographed: - M 31 - Andromeda Galaxy - M 42 - Orion Nebula - M 45 - Pleiades - IC 434 - Horsehead Nebula The Andromeda galaxy soon disappeared behind the house, and so I could take only 10 pictures, which were not enough to make a good photo. Next I processed the Pleiades. From 48 pictures à 30s the following picture was created: M 45 - Pleiades: ZWO ASI 6200 MC Pro, C 11 EdgeHD, Hyperstar V4.0 After that I started with the Orion Nebula. From 138 images à 30s the following image was created: M

Starizona HyperStar 11 V4

Image
December 26, 2020 was finally a clear night. Of course, I finally wanted to try the Hyperstar V4 with the Celestron 11 EdgeHD. So I tried it first with the Orion Nebula (M 42). Already after short exposure times the nebula stood out well. Nevertheless I worked with 30s exposure time (as I had done before with f6.3 and f10). So I hoped to capture more details on the one hand, and the image was not overexposed yet. Raw image stacked in Atik Infinity software (Atik Horizon OSC, 90 frames at 30s low gain) This is the raw image which the Atik Infinity software had stacked. You can clearly see how the stars are quite round in the center and look more and more like small comets towards the edge. This indicates that the sensor of the camera was too close to the optics. That means I will have to position the camera a bit further away in the future. Although the raw material is not convincing, I still stacked and processed it with PixInsight. Interestingly, the effect with the comet-like stars w

PixInsight-Workshop in St. Pölten

Image
For a long time I have been editing my photos only with PixInsight. The software is enormously extensive and therefore also very complex. Since I have problems from time to time and researching on the internet is not always easy I decided to participate in this workshop. Already on the first day I learned a lot of new things, especially in the area of handling the program. Now I am able to use PixInsight much more efficiently. Also the hint on the first day that one should apply many processing steps (e.g. sharpening) only to the luminance part of the image was new to me. Until now I had always applied everything to the RGB image. On the second day we continued with masks. I had already read a lot about it, but here were some easy to understand methods to create good masks very easily. Next I will edit a few photos I took and I am very excited to see the difference. Now I reworked an image of the Trifid Nebula and applied some of the newly learned steps. On the left side is the old ima

20.7.2020: M 8 (Lagoon Nebula), M 16 (Eagle Nebula) and M 20 (Trifid Nebula)

Image
On 20.7.2020 I set up and prepared everything. In Voyager, I wrote a script that takes 200 photos with 30s exposure time each of these three objects. From these pictures I sorted out the bad ones and stacked the rest with PixInsight and did the preprocessing. The postprocessing was limited to histogram transformation and color saturation. M 8 (Lagoon Nebula) M 16 (Eagle Nebula) M 20 (Trifid Nebula)

First Light Celestron CGX 1100 Edge HD

Image
June 24, 2020: Today I was able to pick up the new Celestron CGX 1100 Edge HD. At home I immediately installed and adjusted the polar finder. Then I mounted the optics and balanced the whole thing. Then the finderscope is adjusted to the main optics. Unfortunately I didn't have the right screws to mount the StarSense. Either they were too long or too short ... When it was finally dark I had to do a manual alignment. First I aligned the polar finder as precisely as possible to the north and then carried out a 2-star alignment. For some reason, the finderscope was no longer properly aligned with the main optics. That made it very difficult to find the star with the main optics. Therefore, the whole alignment took a long time. Besides, I probably hadn't done it well either. In any case, I positioned the scope on the M 27, but saw nothing in the image field. The plate solving with Voyager also broke off and could not determine the position. Then I tried it with the M 51, which was

First findings

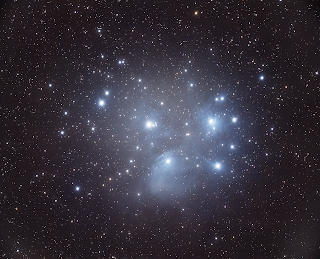
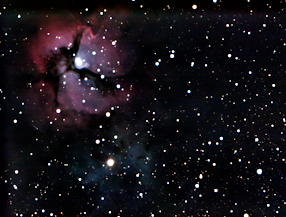
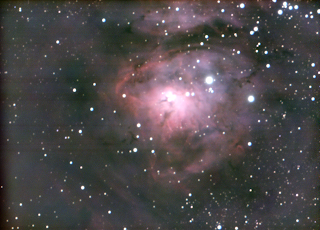
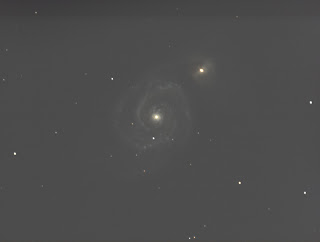
Thanks to the beautiful weather, I have been able to take a lot of photos over the past few weeks and also try out and read a lot. The pictures were reasonably ok, but I found that the stars are not really beautiful and always a bit misshapen. Since I had this phenomenon with 30s as well as with 60s or 120s exposure time, I do not think that it is a problem with the tracking. Otherwise this should have been much more pronounced at 120s exposure time than at 30s. But it wasn't. I also had various problems with editing with PixInsight. The software is extremely extensive and by far the best software for editing astro photos. But correspondingly complex, so I signed up for a course in June and hope to learn a lot there. Here is a list of what I found out during my research on the Internet: The Atik Horizon CMOS sensor is apparently not able to generate stable bias images, i.e. my procedure for preprocessing (bias, dark, partly flat, light) was wrong and therefore could not